Category Archives: Tips and Tricks

Block Facebook Game Requests NOW!

Alright, all of us have friends on Facebook (if you don’t, I wonder what you use it for?) and we use it to catch up with one another or simply just to play some social games on it.

Although I love playing games but, I’m more of a PC / Console gamer (aka serious gamer) while others are into Social Network games. No problem with whichever side you are on…but…WHEN YOUR F*EAKING GAME KEEPS SENDING REQUESTS TO ME…that is CROSSING THE LINE!

And hence, this tutorial is born. If you are as fed up and annoyed as me…enjoy~

Step 1: Click on the request in your Notifications.

Game Request on Notifications


Step 2: Click on the App name as indicated…App Centre is fine too.

Step 2 to Block


Step 3: Look at the bottom right of the page, its where they don’t want you to find it! Click ‘Block’

The Hidden Block


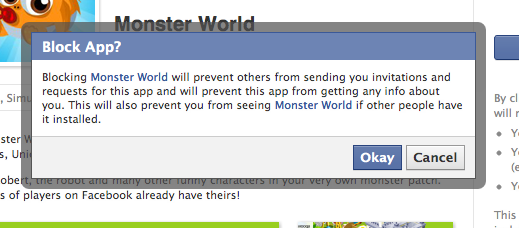
Last Step: Just click ‘Okay’ and you’re done! No more Game Requests from that game from any friends!

Block the App


Alright! So I forgot to mosaic my name and email address from the photos, but I guess you are just too happy to stop all those spams and will forget about harassing me on the internet…or am I wrong?

Tagged , , , , , ,

Tutorial: Joomla Extended Menu Implementation

outcome

A preview of what we are going to make (minus the grey background below as this is a screen shot from my site).

First of all, go download Extended Menu from Joomla’s Extension section and install it into your system. I hope you already know how to do this but if not, I’m sure there are loads of tutorials out there.

Next, go to Modules and click on the name to go into its settings. Go ahead and set it according to the ones I have.

Extended Menu Settings

3 important settings to note:
1. Choose the menu that you want Extended Menu to be applied on in the Menu Name.
2. Choose Tree List from Menu Style.
3. Make the menu expand till what you need but I would think 3 is the max for most of us.

Please note that you do have to leave the Menu Class Suffix and Module Class Suffix as blank so the CSS that I’m going to show you will work as I’m applying the styling to its default. Don’t worry, only the menu will be affected and not all the other links.

Copy and paste this wonderful chuck of code I modified from a CSS Dropdown Menu Tutorial by Harry Roberts into the CSS from your template. Go to Extensions > Template Manager > *Choose Template* > Edit CSS.

#mainlevel{
	list-style:none;
	/* Clear floats */
	float:left;
	width:800px;
        margin:0px;
        padding:0px 0px 0px 10px;
        margin-top:2px;
	/* Bring the nav above everything else--uncomment if needed.*/
	position:relative;
	z-index:5;	
}
#mainlevel li{
	float:left;
	margin-right:30px;
	position:relative;
}
#mainlevel a{
	display:block;
	padding:5px;
	color:#900;
	text-decoration:none;
}
#mainlevel a:hover{
	color:#FFF;
	background:#900;
	text-decoration:none;
}

#mainlevel ul{
	background:#fff; /* Adding a background makes the dropdown work properly in IE7+. Make this as close to your page's background as possible (i.e. white page == white background). */
	background:rgba(255,255,255,0); /* But! Let's make the background fully transparent where we can, we don't actually want to see it if we can help it... */
	list-style:none;
	position:absolute;
	margin:0px;
	padding:0px;
	left:-9999px; /* Hide off-screen when not needed (this is more accessible than display:none;) */
}
#mainlevel ul li{
	padding-top:0px; /* Introducing a padding between the li and the a give the illusion spaced items */
	float:none;
}
#mainlevel ul a{
	white-space:nowrap; /* Stop text wrapping and creating multi-line dropdown items */
}
#mainlevel li:hover ul{ /* Display the dropdown on hover */
	left:0; /* Bring back on-screen when needed */
}
#mainlevel li:hover a{ /* These create persistent hover states, meaning the top-most link stays 'hovered' even when your cursor has moved down the list. */
	background:#900;
	color:#FFF;
	text-decoration:none;
}
#mainlevel li:hover ul a{ /* The persistent hover state does however create a global style for links even before they're hovered. Here we undo these effects. */
	text-decoration:none;
}
#mainlevel li:hover ul li a:hover{ /* Here we define the most explicit hover states--what happens when you hover each individual link. */
	color:#CCC;
	background:#790101;
}

I apologize for the poor styling of the code but I think its easier for you to browse than having the text wrapped within the block quote.
So if you have some basic knowledge of CSS, please go ahead and change them to your liking. If not, please do look for the Background: attribute to change the background color. Color: attribute in order to change the text color. If there is any other tweaking you want to achieve and don’t know how, please leave a comment so either myself or some wise developer can help you out.

Story: I was thinking of implementing a Dropdown Menu for my latest Joomla project and at first I thought it would be already in the default modules but I was wrong. So went on to search for some extensions that would make my life easier and after some recommendations, Extended Menu seems to be the winner.

Extended Menu is a no frills extension that uses pure HTML and CSS to allow developers to create a full (or more) W3C compliant site. Lazy me was thinking that a few switches will get me what I need and decided exploring. 15 minutes into my exploration and nothing worked! Was about to give up but went back to read the fine prints and noticed…”don’t use it if you are not sure what HTML/CSS is and you actually don’t care about web standards (accessibility etc.)

This gives me a clue that I would most likely need to dwell into my own template’s file and do some tweaking. Wanted to see if any kind soul had any tutorial up and found one. Tried it but it seems to be for the previous versions and didn’t work. So that’s the reason for this tutorial and hope that it is of some help.

Tagged , , , , , , , , ,

Tutorial: Installing Joomla 1.5 into CPanel

This is another opportunity for me to share some knowledge from being locked in a room. So in the holidays I’ve been exploring Joomla! and of course, not all servers that you signed up for provides a link to install Joomla! like GoDaddy. So here we go!

Start by logging into your CPanel (normally its http://www.myweb.com:2082 or whatever link that your host provides). This should be idiot proof and I don’t think a screenshot is required right?

Then scroll down to the Databases tab and click on MYSQL Databases.
MY SQL Databases

Which will lead you to this next page.Create a new database

We will need to create a new Database for Joomla! to store all its information. So as you can see, I’m working on my project, Retail Menu so the system added a ‘retailme_’ in front. In order to let me remember this is a database for Joomla! I simply  name it as ‘retailme_joomla’.Click on Create Database to continue onto your first success and then click ‘Go Back‘.

Next we’ll create a User for Joomla! to communicate with the database as shown (its on the same page as the one you created the database from)

Creating a user

Just choose any user name and password that you want and remember to write it down. We’ll need it later during the installation of Joomla! Do note that the system put a prefix of ‘retailme_’ in front of your chosen user name. So my user name is actually ‘retailme_admin’. Go ahead and click on ‘Create User‘ and then return back to same page.

Now we have a database and a user, we need to link it up. In the same page, look for:
Linking user to database

Simply choose the user that you created and the Joomla! database earlier from the dropdown boxes and click ‘Add‘. In the following page, empower this user to every privilege as shown.
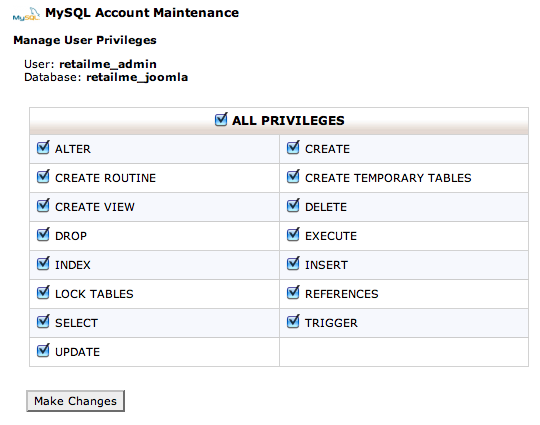
Give all privilege to the user

Click on ‘Make Changes‘ and we are done with the prep work to install Joomla! into our host. Just to check, you will see the linkage at the end of the table as such:
Linkage completed

Not too complicated right? Hang in there for we have completed half the journey.

Now go to http://www.joomla.org/download.html and download the 1.5.x version. You will notice that there is a later version of Joomla! at the top so why shouldn’t you download that instead? My point of view is that the extensions library for the 1.5 is well developed and most of the time, I don’t see myself having trouble with finding one that fits my needs. In due time, we’ll all move on to later versions, but for now, I’m stickin with it.

Downloading Joomla

Download the full package and do not unzip it, its easier to upload just one file than many using CPanel. After the download is complete, go back to CPanel and look for File Manager under the Files tab.
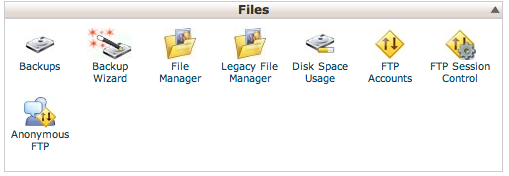
CPanel files manager

A pop up menu will appear for you to choose which directory you wish to open.
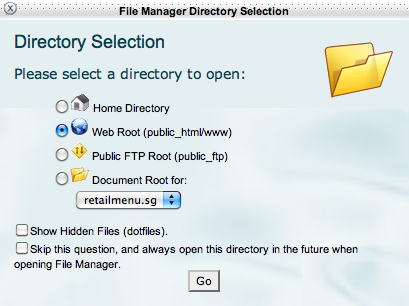
Pop menu to open directory

You will want to choose the directory that web browsers will automatically point to for the home page (aka index page). In most cases of hosting, it will be in public_html. If you have the same screen as me, choose the Web Root and click Go.

CPanel upload

Look for the Upload button on the top menu bar and click it

You will see the Upload screen as below. Click on Choose File and point it to the Joomla! zip package we have just downloaded.
Upload files CPanel

The upload status is on the bottom right and when it says ‘Complete’ as follows, we’re good to go
upload status

Go back to the File Manager screen and you should see the the following:
Extracting Joomla

Highlight the zip folder by clicking on it and then click on Extract at the top. A pop up window will appear and if you have followed my guide to a tee, you can let it point to web root. In my example, it will be ‘public_html’.
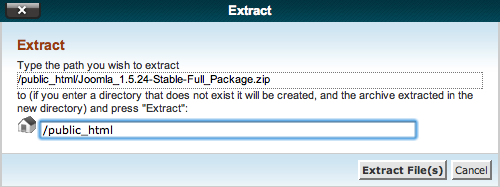
Extract to web root

Click on Extract File(s) and in a blink of an eye, everything is done! Close the dialog window that shows you the files extracted and now you should see an entire collection of folders in your web root directory like this:
Joomla is web root

Alright! We’re done with CPanel and now to see what you’ve achieved. Go to your website’s address / URL like http://www.myweb.com. Nothing special in this.

TA DA!
Joomla start screen

You have successfully installed Joomla! Choose the language of your choice and click Next. Joomla! will conduct a check for you to see if you meet the requirements and provide some solutions if you do not meet them. Go ahead and follow their guide and then click Next.
Joomla server test

Which will lead you to Joomla’s licence page. I know you don’t read it, neither do I. So just click Next and move on to the configurations.
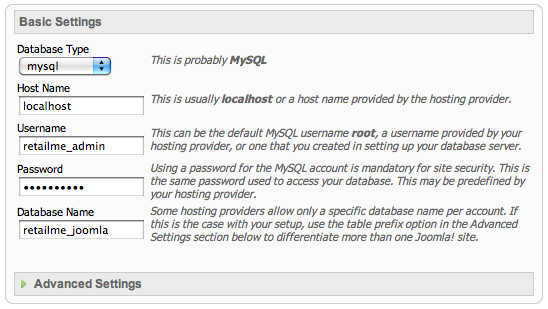
Database setup for Joomla

Remember the username, password and database name I told you to make a note of? Now is a good time to make use of it and enter it as described. The Host Name usually is ‘localhost’ and with my small experiences with host, it usually is like that. If not, go to CPanel > Databases > PHPmyAdmin and look at the top. It will indicate the host name.

Next is the FTP Configuration screen. I don’t use that and prefer to use my own FTP client to go into the Joomla! files to fine tune the looks. If you want the function, just fill in with the necessary info and click Next.
Joomla FTP Config

The next Configuration page will allow you to update the necessary information for your own website. Have fun and give it a name, update your details as the Super Admin and if you wish, you can install the Sample Data available. I normally prefer to install the sample data to configure the look of the data before loading in my own. If you want to install the package, click on the button Install Sample Data.
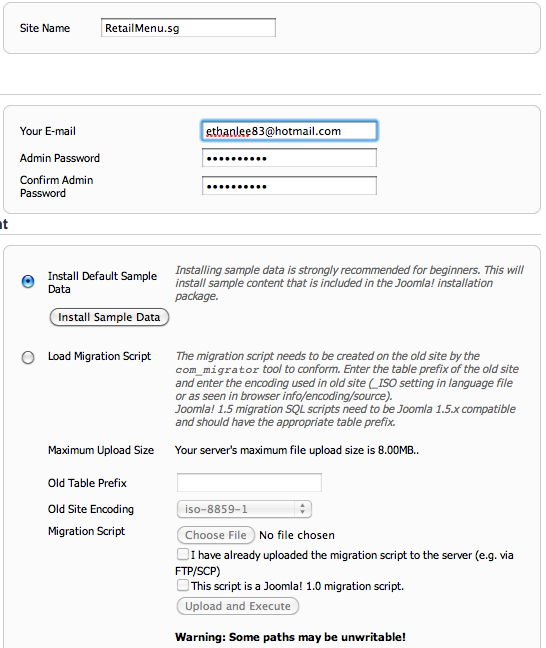
Site Config of Joomla

Click Next and we are left with one last step!  Do not be afraid of this last screen shot I’m going to show you.
Installation complete

The last step you need to do is go back to CPanel and then to File Manager. I hope you remember where it is. Highlight the folder titled Installation and click on Delete as shown.

Cpanel final step

This is important as the files within the Installation folder will allow people to re-install Joomla! on your host and overwrite all the settings and data you have done.

Go back to Joomla! and click on the Site button on the right top, you should see this if you installed the sample data like I did.
Joomla home

To access the backend of Joomla!, just add ‘/administrator’ at the end of your URL like http://www.myweb.com/administrator. User name is Admin and the password will be what you set in the Joomla! configuration page.

Phew~ That’s quite a long one post I’m glad you made it this far. Hope this guide helped you and it definitely will serve as a good refresher for myself. Have fun with Joomla!

Tagged , , , , , , ,

Webpage Not Found When Implementing Facebook ‘Like’ Box

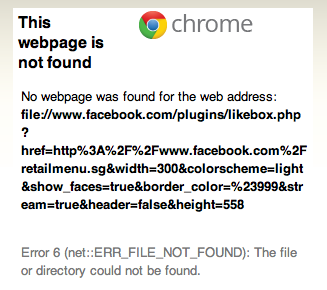
Error from Facebook

Was trying to implement the Facebook “Like” Box using the iFrame method as there wasn’t too much interaction using Facebook’s SDK.

Ended up with the error “Webpage not found.” How could it be? There it was, Facebook staring at me and I even went to the other websites to see if it was a global catastrophe. But no, everyone’s “like” reincarnation was working fine except mine.

Spent an entire 2 whole hours figuring and here’s what happened. The following is the code generated by Facebook when you use their Facebook Developer page.

<iframe style="border: none; overflow: hidden; width: 300px; height: 558px;" src="//www.facebook.com/plugins/likebox.php?href=http%3A%2F%2Fwww.facebook.com%2Fretailmenu.sg& width=300& colorscheme=light& show_faces=true& border_color=%23999& stream=true& header=false& height=558" frameborder="0" scrolling="no" width="320" height="240"> </iframe>


The problem lies here:

src="//www.facebook.com/plugins/likebox.php?


Its missing a “http:” before the two slashes “//”. What your code should look like then?

<iframe style="border: none; overflow: hidden; width: 300px; height: 558px;" src="http://www.facebook.com/plugins/likebox.php?href=http%3A%2F%2Fwww.facebook.com%2Fretailmenu.sg& width=300& colorscheme=light& show_faces=true& border_color=%23999& stream=true& header=false& height=558" frameborder="0" scrolling="no" width="320" height="240"> </iframe>


The codes above are for my own project fan page. You may visit here to generate your own http://developers.facebook.com/docs/reference/plugins/like-box/

Hope this is helpful to anyone who encounters this problem. Think Facebook should fix the bug soon or am I the only one with this problem?


Tagged , , , , , , , , , ,